

How To Create User
The user account can be set to an Admin, Sales, or Technician, each with its own preset permissions and notifications settings. You can customize these settings like Add/View/Edit/Delete voucher for selected module further, if needed to have total control over your users’ experience.
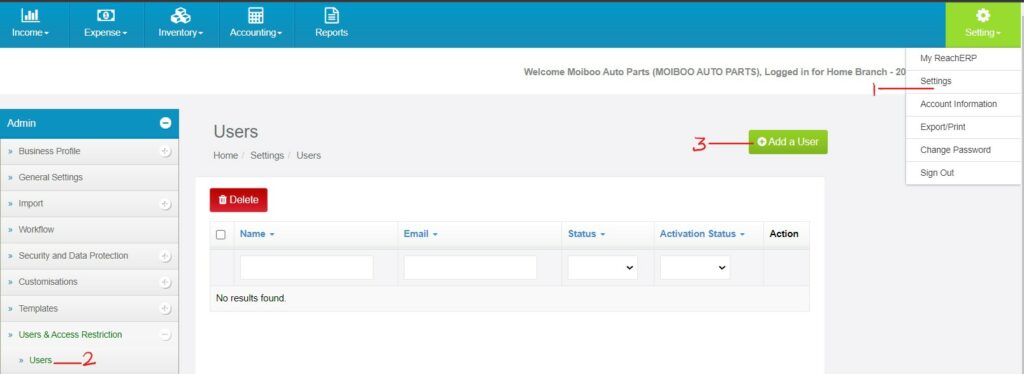
Step 1 > Go to “Setting” under settings tab.
Step 2 > Go to “User” under “Users & Access Restriction”.
Step 3 > Click on Add a User.
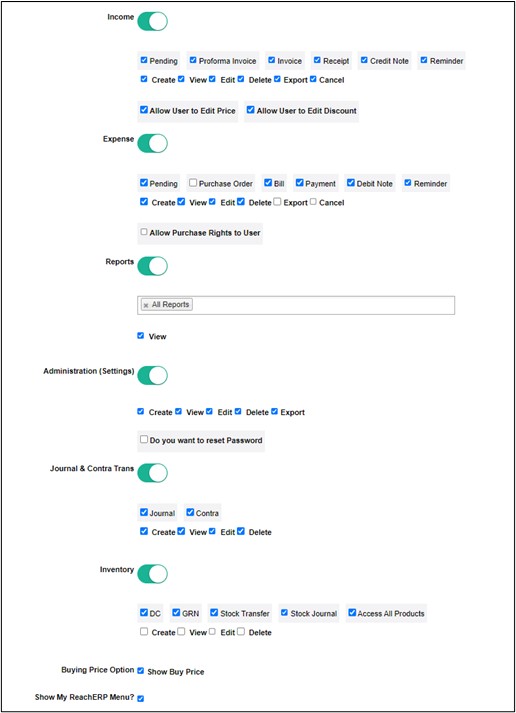
Let’s see about the user access restriction as follows.
1) Income
Using the toggle switch, you can activate the Income Button. According to your preference the user can be given access to the options available below the Income Button, by clicking on the check box.
2) Expense
Using the toggle switch, you can activate the Expense Button. Depending on one’s preference the user can be given access to the options available below the expense button, by clicking on the check box.
3) Reports
Using the toggle switch, the Reports button can be activated. Depending on your preference the user can be given access to the option available below the report button, by clicking on the check box. Under reports there is a drop-down men to choose to access the particular reports.
4) Administration (Settings)
Using the toggle switch, the Administration (Settings) button can be activated.
5) Journal & Contra Trans
Using the toggle switch, the Journal & Contra Trans button can be activated.Depending on your preference the user can be given access to the option available below the Journal & Contra button, by clicking on the check box.
6) Inventory
Using the toggle switch, you can activate the Inventory Button. Depending on one’s preference the user can be given access to the options below the Inventory Button, by clicking on the check box.
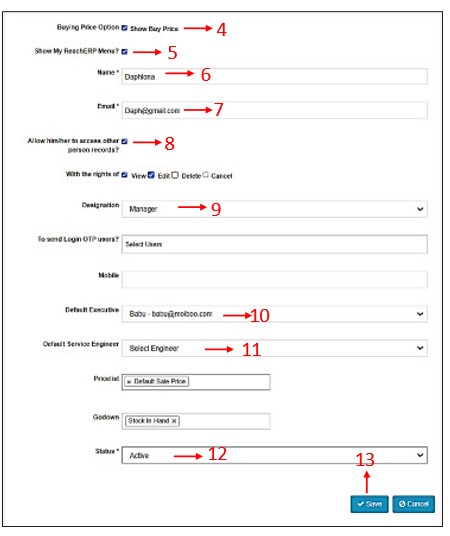
After choosing the Specific module for the user continue the following steps below to create user.
Step 4 > Select the check box if you would like your user to see the Buying price.
Step 5 > If the user is allowed to access the previous year financial date you can select the check box.
Step 6 > Key in the name of the user
Step 7 > Key in the email Id of the user. The user will receive an activation link from Moiboo to have access to the account.
Step 8 > Checking this box will allow the user to access other user’s records.
Step 9 > Key in the designation of the user.
Step 10 > Choose default Executive if required.
Step 11 > Choose default Service Engineer if required.
Step 12 > Click on “Save.”